Bake bite-size cakes with big flavor: fast prep, foolproof steps, and mix-and-match glazes for showers, brunch, or gifting.
You know that moment when dessert hits the table and everyone suddenly becomes a food critic? These mini cakes shut that down fast. They look fancy, taste like you tried hard, and secretly take less effort than most “easy” desserts. You get perfect portions, dramatic ridges that grab glaze like a magnet, and the kind of payoff that makes people ask, “Where did you buy these?” Spoiler: you didn’t. You made them.
What Makes This Recipe So Good
They’re designed for maximum wow with minimal work. The shape does most of the heavy lifting, and a quick glaze turns “nice” into “whoa.” Mini pans also bake faster, so you get tender crumbs without babysitting an oven for an hour.
Flavor stays bold, not bland. A buttery vanilla base plays well with citrus, cocoa, spices, and extracts, so you can remix the same batter into multiple flavors in one baking session.
They’re portion-perfect and gift-friendly. No slicing, no messy crumbs everywhere, no awkward “Is this piece too big?” drama. Each cake becomes its own little event.
What You’ll Need (Ingredients)
These ingredients make a classic vanilla mini bundt base plus two quick glaze options. Stick to room-temperature dairy and eggs for the smoothest batter.
- 2 1/2 cups all-purpose flour
- 2 teaspoons baking powder
- 1/2 teaspoon baking soda
- 1/2 teaspoon fine salt
- 3/4 cup unsalted butter, softened
- 1 1/2 cups granulated sugar
- 3 large eggs, room temperature
- 2 teaspoons vanilla extract
- 1 tablespoon lemon zest (optional but highly recommended)
- 1 cup buttermilk, room temperature
- 1/4 cup sour cream or plain Greek yogurt
- Nonstick baking spray with flour, or softened butter plus flour for the pan
- 1 1/2 cups powdered sugar (for glaze)
- 2 to 4 tablespoons milk or lemon juice (for glaze)
- 1/2 teaspoon vanilla extract (for glaze)
- Pinch of salt (for glaze balance)
- Optional toppings: sprinkles, toasted nuts, shredded coconut, or freeze-dried fruit powder
Let’s Get Cooking – Instructions
This method assumes a standard 6-cavity mini bundt pan (about 1 cup capacity per cavity). If your pan is smaller, fill less and start checking earlier.
-
Preheat and prep like you mean it. Heat the oven to 350°F. Spray every groove of the mini bundt pan with baking spray that contains flour, or butter and flour it thoroughly. Miss a ridge and your cake will cling like it pays rent.
-
Mix the dry team. Whisk flour, baking powder, baking soda, and salt in a bowl. Set it aside so it can pretend it’s not important.
-
Cream butter and sugar for lift. Beat butter and sugar until light and fluffy, about 2 to 3 minutes. This step builds air, which helps your cakes rise and stay tender.
-
Add eggs the smart way. Beat in eggs one at a time, mixing well after each. Scrape the bowl. Add vanilla and lemon zest if using.
-
Bring in the moisture boosters. Stir sour cream into the buttermilk. Yes, it looks odd. No, it’s not a mistake. It makes the crumb soft and rich.
-
Alternate dry and wet without overthinking. Add the flour mix in three additions, alternating with the buttermilk mixture in two additions. Mix just until combined. Overmixing turns tender cake into a chewy audition for bread.
-
Fill for shape, not chaos. Spoon batter into each cavity about 2/3 full. Tap the pan gently on the counter to settle batter into the ridges and pop big air bubbles.
-
Bake fast, check early. Bake 16 to 22 minutes, depending on your pan. The tops should spring back lightly, and a toothpick should come out clean or with a few moist crumbs.
-
Cool with strategy. Let cakes cool in the pan 10 minutes, then invert onto a wire rack. If one sticks, don’t panic. Tap the pan gently, then give it a few extra minutes to release.
-
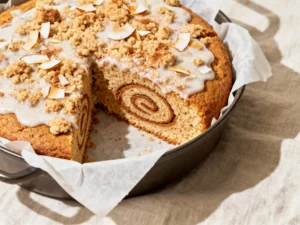
Glaze for maximum flex. Whisk powdered sugar, 2 tablespoons milk or lemon juice, vanilla, and a pinch of salt. Add liquid a teaspoon at a time until it ribbons off the whisk. Drizzle over cooled cakes, then top as you like.
Storage Tips
Room temperature: Store unglazed cakes in an airtight container for up to 2 days. If glazed, keep them in a single layer or separate layers with parchment to avoid “glaze tattoos.”
Refrigerator: Refrigerate for up to 5 days, tightly covered. Let cakes sit at room temp for 20 to 30 minutes before serving so the texture turns soft again.
Freezer: Freeze unglazed cakes wrapped individually, then placed in a freezer bag for up to 2 months. Thaw at room temp and glaze fresh for the best finish, IMO.
What’s Great About This
They’re consistent. Mini cakes bake evenly and cool quickly, so you get reliable results even if your oven runs a little moody.
They’re customizable. One batter can become a dessert “flight” with different glazes and toppings. That’s basically hosting on easy mode.
They’re camera-ready. Those ridges catch light, glaze, and attention. If you post them, don’t act surprised when your DMs turn into recipe requests.
Avoid These Mistakes
Skipping proper pan prep. A mini bundt pan has more nooks than a mystery novel. Grease every ridge, or you’ll lose half the design on release.
Overfilling the cavities. Fill about 2/3 full. More batter doesn’t equal more cake; it equals overflow and sad, blunt edges.
Overmixing after adding flour. Stir just until you stop seeing dry streaks. Gluten loves attention, and you should give it less.
Glazing while warm. Warm cakes melt glaze into a sticky sheen that slides right off. Cool cakes hold that dramatic drizzle like a pro.
Recipe Variations
Use the same method and bake time range, but keep an eye on doneness since mix-ins can change moisture.
-
Chocolate espresso: Replace 1/3 cup flour with 1/3 cup unsweetened cocoa powder, and add 1 teaspoon espresso powder. Glaze with a coffee glaze using strong brewed coffee instead of milk.
-
Lemon poppyseed: Add 2 tablespoons poppyseeds and increase lemon zest to 2 tablespoons. Use lemon juice for the glaze and finish with extra zest.
-
Brown butter vanilla: Brown the butter, cool until soft but not liquid, then cream with sugar. Add an extra pinch of salt for a bakery-style flavor.
-
Spiced chai: Add 1 1/2 teaspoons cinnamon, 1/2 teaspoon cardamom, and 1/4 teaspoon ginger to the dry mix. Top with a vanilla glaze and crushed pistachios.
-
Berry swirl: Drop small spoonfuls of thick jam into each cavity and swirl gently with a toothpick. Keep it subtle so the cakes bake evenly.
FAQ
How full should I fill a mini bundt pan?
Fill each cavity about 2/3 full. This gives the cakes room to rise while keeping the center fully baked and the ridges sharp.
Do I need buttermilk, or can I substitute?
Buttermilk gives tenderness and a slight tang. If you don’t have it, mix 1 tablespoon lemon juice or vinegar with 1 cup milk and let it sit 5 minutes, then use it as directed.
Why did my cakes stick to the pan?
Usually it’s pan prep or timing. Grease every groove and let cakes cool about 10 minutes before inverting; too soon and they tear, too late and sugar can glue them in place.
Can I make these ahead for a party?
Yes. Bake a day ahead, store airtight, and glaze a few hours before serving. If you want the freshest look, glaze right before guests arrive.
What’s the best glaze consistency for that “drip” look?
A good glaze falls in thick ribbons and disappears into the surface after a second. If it pours like milk, add powdered sugar; if it clumps, add liquid a teaspoon at a time.
Can I use this batter for muffins instead?
Yes, it works well in a muffin tin. Fill about 2/3 full and start checking around 14 to 18 minutes, depending on your oven.
Final Thoughts
Mini bundt cakes are the dessert equivalent of showing up early, dressed well, and somehow still relaxed. You get bakery vibes without bakery prices, and the portioning solves the “who’s cutting the cake?” problem instantly. Keep the base recipe, swap flavors, and let the glaze do the bragging for you. FYI, once you bring these to one event, people will expect them forever, so plan accordingly.