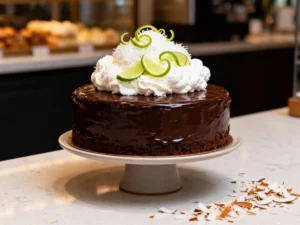
Bake a silky, sliceable dessert with a golden top and zero drama, using pantry basics and a few chef-level tricks.
You want a cake that feels expensive but acts low-maintenance. You want that “how is this so smooth?” bite without babysitting a soufflé. And you definitely want something that gets compliments before it even cools. Good news: this is the dessert version of showing up five minutes late and still winning.
This custard-forward cake hits the sweet spot between creamy and sliceable, with a soft crumb and a glossy, set center. It’s the kind of bake that turns a random Tuesday into “we should light a candle for this.” If your group chat loves posting food wins, this is your moment.
The Secret Behind This Recipe
The “secret” is not magic, it’s temperature control and gentle mixing. Custard hates chaos. Warm milk helps dissolve sugar and bloom flavor, but you don’t want it hot enough to scramble eggs like you’re making breakfast.
Also: don’t whip like you’re training for a boxing match. Too much air makes the cake rise fast, then collapse into sadness. Mix just until smooth, bake in a water bath to keep heat even, and chill long enough to let the custard fully set. Boring steps, elite results.
What Goes Into This Recipe – Ingredients
- For the custard cake base: 4 large eggs, room temperature
- 1 cup (200g) granulated sugar
- 1/3 cup (40g) cornstarch
- 1/4 teaspoon fine salt
- 2 cups (480ml) whole milk
- 1/2 cup (120ml) heavy cream
- 2 teaspoons vanilla extract
- 1 tablespoon unsalted butter
- For the cake structure: 1 cup (125g) all-purpose flour
- 2 teaspoons baking powder
- 1/2 cup (115g) unsalted butter, softened
- Optional flavor boosts: zest of 1 lemon, 1/2 teaspoon cinnamon, or 1 teaspoon almond extract
- For finishing: powdered sugar for dusting, fresh berries, or toasted sliced almonds
- For the pan and water bath: nonstick spray or butter, parchment paper, and hot water
Step-by-Step Instructions
-
Prep like you mean it. Heat oven to 325°F (163°C). Grease and line a 9-inch springform pan with parchment on the bottom. Wrap the outside of the pan in two layers of foil to block water leaks.
-
Set up the water bath. Place the wrapped pan in a roasting pan. Put a kettle on to heat water; you want it hot, not boiling aggressively.
-
Make the custard base. In a saucepan, warm milk and cream until steaming and just shy of simmering. Turn off heat and stir in vanilla and the 1 tablespoon butter.
-
Whisk the “no lumps allowed” mix. In a large bowl, whisk eggs and sugar until glossy and lighter in color, about 1 minute. Whisk in cornstarch and salt until smooth.
-
Temper without panic. Slowly whisk in the warm milk mixture in a thin stream. Keep whisking gently so the eggs don’t curdle. If you see bubbles, you’re still fine, just don’t create a foam party.
-
Build the cake batter. In a separate bowl, whisk flour and baking powder. In another bowl, beat softened butter until smooth, then add a few spoonfuls of the custard mixture to loosen it. Add remaining custard gradually and whisk until fully combined.
-
Combine and strain (chef move). Whisk the flour mixture into the custard batter just until no dry streaks remain. For extra silkiness, pour through a fine-mesh sieve into the prepared pan.
-
Add water, then bake low and slow. Slide the roasting pan into the oven. Carefully pour hot water into the roasting pan until it reaches halfway up the springform. Bake 60 to 75 minutes, until edges look set and the center jiggles like gelatin, not soup.
-
Cool in stages. Turn off oven, crack the door, and let the cake sit 20 minutes. Remove from water bath, peel off foil, and cool to room temp. Then refrigerate at least 4 hours, ideally overnight.
-
Serve with confidence. Release the springform ring, dust with powdered sugar, and top with berries or almonds. Slice with a warm knife for clean edges. Yes, it’s allowed to admire it first.
Preservation Guide
This cake stores like a champ because the custard firms up even more as it rests. Cover the cake tightly or store slices in an airtight container to protect that creamy texture from fridge-dryness. If you leave it uncovered, the top can turn a little leathery, which is not the vibe.
Refrigerator: Keep for up to 4 days. The flavor actually improves after day one, which feels unfair to other desserts.
Freezer: Freeze slices wrapped in plastic wrap and then foil for up to 2 months. Thaw overnight in the fridge. Expect a slightly softer texture after freezing, but still very snackable, IMO.
Serving from cold: Serve chilled for the cleanest slice, or let sit 10 to 15 minutes for a creamier mouthfeel. Either way, it wins.
Why This is Good for You
Let’s be honest: you’re not eating cake to become a superhero. But this one brings some real perks. Eggs and dairy deliver protein that helps you feel satisfied, so you don’t immediately hunt for “just one more cookie.”
Milk and cream add calcium and some vitamin D, depending on what you use. And because the flavor leans rich and vanilla-forward, you can keep slices modest and still feel like you got the full experience. Portion control by pleasure, not punishment.
If you add berries on top, you get extra fiber and antioxidants without turning dessert into a lecture. FYI, your taste buds will not complain.
Common Mistakes to Avoid
- Overheating the milk: Boiling hot liquid can scramble eggs during tempering. Aim for steaming, not raging.
- Whipping too much air: Too much foam can cause dramatic rising and sinking. Gentle and smooth beats fluffy here.
- Skipping the water bath: Direct heat can curdle the edges and crack the top. The water bath is your custard insurance policy.
- Underbaking the center: A little jiggle is good; liquid slosh is not. If the center ripples, bake longer.
- Rushing the chill: Warm custard cake slices like a mess. Chill time equals clean slices and better texture.
- Using low-fat dairy: You can, but the texture turns less luxurious. This is not the place to be “responsible.”
Mix It Up
Once you nail the base, you can customize without breaking the science. Think of it like a reliable friend who also looks good in every outfit.
- Lemon silk: Add lemon zest and swap vanilla for 1 teaspoon lemon extract for a bright, bakery-style flavor.
- Caramel top: Drizzle salted caramel over chilled slices and sprinkle flaky salt. It tastes like a fancy café dessert you “accidentally” made at home.
- Chocolate swirl: Melt 3 ounces of dark chocolate and swirl it into the batter right before baking for dramatic ribbons.
- Coconut cream: Replace 1/2 cup of the milk with canned coconut milk and top with toasted coconut.
- Fruit layer: Add a thin layer of jam on the bottom of the pan before pouring batter. Raspberry and apricot work especially well.
- Spiced comfort: Add cinnamon and a pinch of nutmeg for a warm, holiday-adjacent vibe.
FAQ
How do I know when the custard cake is done?
Look for set edges and a center that jiggles gently when you nudge the pan. The surface can be lightly golden, and a knife inserted near the edge should come out mostly clean. If the center ripples like a wave, keep baking.
Can I make this without a springform pan?
Yes, but unmolding becomes trickier. Use a deep 9-inch cake pan lined with parchment on the bottom and sides, then lift it out after chilling. You’ll sacrifice a little clean-edge perfection, but the flavor won’t care.
Why did my cake crack on top?
Cracks usually come from heat stress: oven too hot, no water bath, or baking too long. Don’t stress back; dust with powdered sugar or add berries and call it “rustic.”
Can I use vanilla bean instead of extract?
Absolutely. Split 1 vanilla bean, scrape the seeds into the warm milk mixture, and let it steep for a few minutes. The flavor gets deeper and more aromatic, like you knew what you were doing all along.
What if my custard looks lumpy during mixing?
Strain it through a fine-mesh sieve before baking. That fixes most texture issues instantly. If it’s severely curdled, the milk was likely too hot, and you may need to restart for best results.
Can I add toppings before baking?
Light toppings like a sprinkle of sugar work, but heavy fruit can sink and release moisture. Add berries after baking for the cleanest set and best texture. If you want baked-in fruit, use a thin jam layer instead.
Wrapping Up
This custard cake gives you that bakery-smooth center, a tender crumb, and a finish that screams “special occasion” even if you made it in sweatpants. Stick to gentle mixing, use the water bath, and chill like you mean it. The payoff tastes like patience and bragging rights.
Make it once, and you’ll start volunteering to bring dessert—dangerous behavior, but understandable. When someone asks where you bought it, you get to say, “Oh, I made it,” and act casual. That’s the whole point, isn’t it?